Classes

Showing posts with label Sculpture. Show all posts

8th- Modular Sculptures


This project is brought to you by THAT ART TEACHER, she has a super awesome blog too! You should check it out sometime!


 Tate defines modular as “a term used particularly in relation to minimalism, referring to a work of art with constituent parts that can be moved, separated and recombined.”

During the 1960s artists began creating simple sculptures made from industrial materials like sheet metal, plywood and bricks. In order to distance themselves from traditional sculpture, minimalist artists would describe these artworks in very literal ways, calling them ‘specific objects’ or ‘modules’.

The term modular is closely associated with the artist Sol LeWitt who, in 1965, began working on a series of open and closed cubes, like building blocks, which could be ordered and inter-locked in various different combinations in accordance with a pre-determined system.


Rasheed Araeen is a great artist to study minimalism, geometric shapes and modular art.  You can read about his work here on the Tate Museum website.


Camilla Løw is another artist that connects to minimalism and geometric shapes.  She creates fun sculptures that are great examples of non-objective art.  See examples of her work here.


Directions:

MAKING MODULES


Remember,  Tate defines modular as “a term used particularly in relation to minimalism, referring to a work of art with constituent parts that can be moved, separated and recombined.” 

1. You and your partner need to decide on a shape and make as many as you can with the popsicle sticks provided. Be creative and think of all the different shapes you could make before deciding. You can use Elmer's glue for this step. 

2. After all of your modules have been constructed, you and your partner will choose a color to paint them. Paint all of your modules the same color. 

3. Using your cardboard base as a starting point, begin arranging your modules to create an interesting abstract form with your shapes. Use hot glue to put the modules together. You're sculpture needs to be balanced and stand on its own. 

(Remember, your sculpture will be painted a single color at this point)

4. After you finish assembling your sculpture, you will be able to add another color to your sculpture by splattering paint onto it. 

5.  Let your sculpture dry and submit your sculpture to Artsonia.
You should submit two photos of your sculpture from different angles for full credit.
Your and your partner should both submit photos. 


6th Grade- Jean Dubuffet Sculptures

For this project, we will look at Jean Dubuffet. We will look specifically at his sculptures using the Hourloupe style. You and a partner will create a sculpture in DuBuffet's Hourloupe style.

DAY 1- Intro

Today we will look at a history of DuBuffet and take a look at his artworks. 


Here is a brief biography of DuBuffet.


“French painter, sculptor, printmaker, collector and writer. He was temperamentally opposed to authority and any suggestion of discipline and devised for himself a coherent, if rebellious, attitude towards the arts and culture. For all his maverick challenges to the values of the art world, Dubuffet’s career exemplified the way in which an avant-garde rebel could encounter notoriety, then fame and eventual reverence. His revolt against beauty and conformity has come to be seen as a symptomatic and appreciable influence in 20th-century culture.”

“Dubuffet's Hourloupe style developed from a chance doodle while he was on the telephone. The basis of it was a tangle of clean black lines that forms cells, which are sometimes filled with unmixed color. He believed the style evoked the manner in which objects appear in the mind. This contrast between physical and mental representation later encouraged him to use the approach to create sculpture.”

“His primitive approach to art making, with its simple, childlike figures and bold, visually dramatic palette, has universal appeal and is instrumental in modern psychology and studies of mental development.”


Examples of DuBuffet sculptures in the hourloupe style


DAY 1 ACTIVITY


After you have watched the videos, get a piece of paper and begin practicing the hourloupe style, following the directions in the vimeo video above. Today is a practice day, so work on trying to capture the hourloupe style in your artwork.


DAY 2-3  Sculpture (Making pieces)

After discussing Dubuffet and his artworks we will begin to create our own DuBuffet styled sculptures.

1. Look through the slides and the links below to gain some inspiration for your sculpture idea.


2. Draw 5-6 shapes on the piece of paper. Make your shapes large enough to fill the paper.


3. Cut out your shapes.


4. Draw the Hourloupe style drawings on each of your pieces. Don't forget to draw on both sides of your pieces!


5. Add color to your pieces. Remember to mimic DuBuffet's style. Use only red and blue and color some spaces in solid and others with stripes. 


Day 3-4 Sculpture (Assembling)

5. Put your pieces together by cutting small cuts into the pieces and sliding pieces together.
Click here to find examples of making a "base" for your sculpture so it will stand. 
You cannot use glue or tape to put pieces together.
6. We will display your sculptures in the hallway after you and your 
partner take a picture of it on Artsonia. 


Here are 3 links for you to look at some sculpture ideas for your project.

Link 1

Link 2

Link 3


AR Standards: CR1.6.1 CR1.6.3 CR2.6.1 CR2.6.2 P4.6.1 R7.6.1

8th Grade- Magazine Sculptures

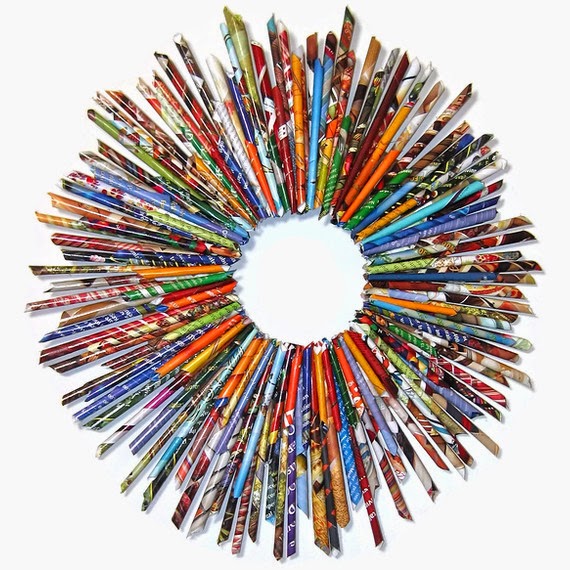
For our next project you will be using magazines and colored paper to create a sculpture of your choice. Your sculpture can be a relief sculpture, for hanging on a wall, or a sculpture in the round that stands on its own.

Check out the artwork from artist Yun-Woo Choi here: https://mymodernmet.com/yun-woo-choi-magazine-sculptures/

The pictures below are all examples of different magazine sculptures. They all look different but are all basically made the same way. Roll the magazine strips into tubes and glue them into an interesting pattern. Notice how the texture of the paper rolls create a nice pattern and rhythm in your work.


8th- Wayne Thiebaud, Cakes, and Paper Mache

Our next project will take a look at artist Wayne Thiebaud for inspiration. We will create a paper mache food sculpture inspired by Thiebaud, and create a painting and drawing in his style. We will also discuss the art of trompe l’oeil as we create our sculptures.


Explore

Today you will explore how Thiebaud created his artworks. You will draw and color two small artworks as you practice his style, using colored pencils as your medium. Focus on the shapes as you draw the desserts. Try to create a color palette like Thiebaud. 

How to Draw like Thiebaud

Thiebaud Color Theory


Food Sculpture

After sketching thumbnails you will create a toilet paper mache sculpture of your dessert. After your sculpture dries, you will paint it with tempera paint.


Toilet Paper Food Demo


Food Painting

We will also paint a piece of cake in Thiebaud’s style. We will paint from a reference piece of cake for this project. We will use acrylic paint to complete you cake paintings. 


8th-Paper Relief Sculpture


This project will examine relief sculpture and the difference between shapes and forms.
Students will experiment with different paper shapes, folding and curling them into interesting forms.

After they find a shape they like, students will make 50 variations of their form to create a relief sculpture. Students will display their artwork in the hall with a written exhibition narrative for the viewer.


Different types of relief sculpture:

Low-Relief /Ancient Coins


Low-Relief /Ishtar Gate
https://en.wikipedia.org/wiki/Ishtar_Gate?scrlybrkr=8c9a3a4d


High-Relief/ Ludovisi Battle Sarcophagus


Project Examples: 


Here are some examples of paper forms you could try out:


Many more examples of the finished projects can be found here:


8th AR Standards: CR1.8.1 CR2.8.1 P5.8.1 R9.8.1

7th- Alberto Giacometti, Surrealism, and the Figure


For our next project we will examine Surrealism and Alberto Giacometti. Giacometti was a surrealist sculptor and painter. We will create two artworks during this project. One project is an individual painting and the other is a collaborative sculpture with a partner.


DAY 1-2

Watch the videos above on Day 1. 
After you finish watching the videos, take a look at the links above and answer the worksheet.


DAY 3-4

Portrait painting
Day 3 and 4 we will create a portrait in Giacometti's style.
Then paint the portrait with tempera and cover with india ink to create a resist effect.
We will take a look at basic facial proportions for this project.


DAY 5-9

The final project will be a partner project. The two of you will create a sculpture of the human figure in Giacometti's style.


8th- Gesture Drawing, Semiotics, and Keith Haring


Keith Haring


Keith Allen Haring (May 4, 1958 – February 16, 1990) was an American artist whose pop art and graffiti-like work grew out of the New York City street culture of the 1980s.
Haring's work grew to popularity from his spontaneous drawings in New York City subways – chalk outlines on blank black advertising-space backgrounds – depicting radiant babies, flying saucers, and deified dogs. After public recognition he created larger scale works such as colorful murals, many of them commissioned. His imagery has "become a widely recognized visual language"
Semiotics- the study of signs and symbols as elements of communicative behavior; the analysis of systems of communication, as language, gestures, or clothing


Gesture Drawing- gesture drawing is a laying in of the action, form, and pose of a model/figure. Typical situations involve an artist drawing a series of poses taken by a model in a short amount of time, often as little as 10 seconds, or as long as 5 minutes. Gesture drawing is often performed as a warm-up for a life drawing session.

The primary purpose of gesture drawing is to facilitate the study of the human figure in motion. This exploration of action is helpful for the artist to better understand the exertions of muscles, the effects of twisting on the body, and the natural range of motion in the joints. Basically, it is a method of training hands to sketch what the brain has already seen.


Keith Haring Bio
Semiotics


DAY 1


After looking at the links and watching the videos, answer the Keith Haring worksheet.


DAY 2

Gesture Drawing Practice

 We will all work and draw together today.

Separate your paper into 4 sections to create 4 drawings.

Remember, Gesture Drawings are quick and are trying to 
capture motion through dynamic linework.


DAY 3

Keith Haring Collaboration

Today we will complete a one day Keith Haring inspired 
gesture drawing on a 3x5 piece of paper.

Color your artwork using the materials provided.


DAY 4-8

Keith Haring Gesture Sculptures

Your final art piece for this project is a poster board sculpture inspired by Keith Haring's figures. You can use one of Haring's figures or you can create your own figure in his style.
After you build your figure, you will paint it with acrylic paint.