Classes

Showing posts with label 7th Grade. Show all posts

7th-Papercutting and Calligrams

Artists are going to create a calligram, using only colored paper. A calligram is a word or piece of text in which the design and layout of the letters creates a visual image related to the meaning of the words themselves. (Examples below)


Paper was invented in China during the first century and has been a popular media choice for artists ever since. Because paper is fairly fragile, we have no way of knowing how long papercutting has been a part of Chinese culture. Archaeologists have found evidence dating it back as far as the 6th century, but it is believed to have begun a few centuries earlier. Either way, it is clear that papercutting is an art with strong roots in the art of China.


Day 1

Brainstorm ideas for your calligram. You should think of multiple words that could be used for the project. Today you should create 4 different ideas, using 4 different words.

Day 2-6

Following the steps below, create your calligram. You can not have any drawn elements. Everything must be made out of paper. All details must be made out of paper. 


7th AR Standards: CR1.7.1 CR2.7.1 CR3.7.1 R7.7.1 CN10.7.1

7th- Graffiti

7th Grade Graffiti Unit- 

"From 'Tags' to 'Pieces': Creating a Personal Identity"


For the next few weeks we will be working on creating a personal identity and showcasing it through our artwork. We will be learning about the history and art form of graffiti. The term graffiti is writing or drawings that have been scribbled, scratched, or sprayed illicitly on a wall or other surface in a public place. Graffiti ranges from simple written words to elaborate wall paintings, and it has existed since ancient times, with examples dating back to Ancient Egypt, Ancient Greece, and the Roman Empire. In modern times, paint, particularly spray paint, and marker pens have become the most commonly used graffiti materials. In most countries, marking or painting property without the property owner's consent is considered defacement and vandalism, which is a punishable crime.

We will be using the website https://graffitiknowhow.com/ for a lot of info.


During our first week you will decide on a tag, or nickname, to use for the graffiti unit; practice creating graffiti letters and brainstorm ideas for your first piece. You will need to come up with a nickname to use that is at least 4 letters long and not part of your actual name. 

DAY 1-2

Digital Creation

Today after our introduction we will use an Online Graffiti Generator from Graffiti Empire to play around with some different lettering styles and creating a digital image of your graffiti using Photopea to place your graffiti on a building/wall/train car of your choice.  

1. Create some different versions of your nickname using the site above. Take screenshots of your name for step 2 in photopea. Make at least two different versions of your name

2. Find two images to use for your backgrounds. They can be a building, a wall, a train car, or anything else that you would like to "tag." Following the instructions in class, combine your images together to finish your artwork. 


DAY 3-4

Practicing Fonts 


1.  Practice creating different lettering ideas. You should use your initials for this step. You can take a look at one of the links below for help and inspiration. You can also use sites like 1001fonts.com to find graffiti inspired fonts. 

2. Use a nickname for yourself that is at least four letters long. Fold a piece of paper in half and practice your nickname using two different graffiti fonts. Choose a color scheme and practice blending some of your colors together to make interesting color combinations. Think about how you will create contrast between your background shape and your name. 

KEEP YOUR SKETCHES FROM THESE TWO DAYS. YOU WILL NEED TO SUBMIT THEM FOR CREDIT. 


Here is a link to a site that discusses creating graffiti letters. It could also be helpful as you work on creating your different design ideas. 

Here is another website with a good tutorial on word placement and blending colors.

Here is a wikihow with two font design tutorials with step by step instructions.

Here is a Youtube site, DK Drawing that has a ton of graffiti tutorial videos.


DAY 5-10


Our final project will be creating a small fence sculpture with your graffiti painted on its side. We will be using paint and posca pens to paint your graffiti design on the side of your fence. 


Remember to make your piece bold and colorful. This is a personal art piece that represents you. Use colors that you like and choose a style of letters that you enjoy.


7th AR Standards: CR1.7.1 CR 2.7.1 CR2.7.2 CR3.7.1 P5.7.1 R7.7.2 CN10.7.1 CN11.7.1

7th- Digital Art Parody

We will look at and discuss parodies for our next project. A parody (also called send-up or spoof), is a work created to mock, comment on, or poke fun at an original work, its subject, author, style, or some other target, by means of humorous, satiric or ironic imitation. You will create two parodies of a famous classic artwork for your project this week.

Original


Parody


You will be randomly assigned one of these four artists/artworks for your parody:

1. Leonardo da Vinci- Mona Lisa
2. Grant Wood- American Gothic
3. Edvard Munch- The Scream
4. Rene Magritte- The Son of Man

Day 1 Complete Worksheet

Complete the parody worksheet and begin sketching/writing ideas for your parody.

Day 2-6 Complete your Digital Parodies

Your will have four  days in class to complete your parodies. Create TWO parodies of your artwork using PIXLR.COM using some of the techniques discussed in class to manipulate the paintings.


Parody
Original


                                          7th AR Standards: CR1.7.1 R7.7.2 CN10.7.1                                       

7th- Creating the Illusion of Space: Linear Perspective/Connected Boxes

There are many ways to create depth and show space on a 2d surface. Artists will take a look at the different ways we can achieve this effect.


http://www.noupe.com/design/turning-2d-into-3d-seeing-the-new-angle.html

1. Linear Perspective- By using either 1 point perspective2 point perspective, or 3 point perspective, an artist can create the illusion of space.  Linear perspective is a drawing method that uses lines to draw objects in space.
2. Overlapping- When one object is positioned in front of another object, part of the object behind it may be blocked from view.  This is called overlapping. 
3. Size- Objects that are closer to a viewer appear larger than objects that are further off in the distance.
4. Placement on the Surface- Generally, objects that are positioned lower on the picture plane will appear closer than objects that are positioned higher on the picture plane.
5. Color and Value- Objects that are closer to a viewer appear darker in value and warmer incolor.  Objects that are further away appear lighter in value and cooler in color.
6. Detail- Objects that are closer appear more detailed than objects that are further away.
Six ways to create the illusion of space are illustrated in this video...


DAY 1-2:

After watching the video, use the worksheet to draw 6 complete drawings in the sections provided that show the six ways to create space. These should be complete drawings in full color. They should not be the same simple artworks from the video. 


DAY 3-6:

Connected Boxes

Your linear perspective project will task you with drawing 5 to 7 boxes in linear perspective and then connecting  them with some sort of line (rope, water hose, yarn, etc.)


Here is a simple example. Notice the step by step instructions along the right side of the example.


Here is my example with some step by step pictures below:


Here are a couple more links with a bunch of examples of this project.


7th AR Standards: CR1.7.1 R7.7.1 CN10.7.1

7th Grade- Create an OC

OCstands for Original Character.

OC is an internet slang initialism referring to a minor character in an existing canon whose role is being expanded by a fanfiction writer or a completely new character who exists in the reality of a published canon.


For our next project you will be creating on original OC. You will use the worksheet provided to help build your character from scratch before you begin sketching and then completing a final artwork of your OC. 


I used many websites as inspiration for this project. You can check them out by clicking on their links below. 

https://sparketh.com/how-to-create-an-original-character/

https://www.clipstudio.net/how-to-draw/archives/154434

https://www.skillshare.com/en/blog/how-to-design-your-own-character-character-design-generator/

https://reallygooddesigns.com/how-to-design-character/


DAY 1-2


We will begin by filling out this OC Starter Sheet to help you create a character that is complex because OC's are like onions, ya know......they have layers 🧅😬😀

Having a well rounded, dynamic character will give you more items to and ideas for what to add to your characters drawing. How will you showcase your OC's backstory and personality into the way the look or the posture they keep? How will you showcase their goals or mission through the items they carry or the clothing they wear? Do you want your OC to be from our universe or to originate from an alternate universe of your choice? These questions and many others will be answered in this starter sheet. 


DAY 2-4

Now that you have a solid idea for your character, for the next few days we will continue researching and developing your character. 
Use the internet or the books out of the classroom library to start helping you develop the visual side of your OC. During this time you should be researching, writing, and sketching. Below are some example images of this step in progress.. 

Your research and development doesn't have to look like this but you should have some form of brainstorming and practice evident before you move onto final development. 


DAY 4-8


Create your final OC artwork. Your OC artwork must contain a background and image based on the info that you gave in your worksheet. Use all the references and visual aids that you have acquired over the first two steps. Create your OC using prismacolors, creating on an iPad, watercolor and ink, or using alcohol based markers. Your character can be drawn in any style that you would like to use.


7th- Illuminated Letters

Our next project examines the art of Illuminations. 
Look at the slide show to learn about illuminated letters.

After looking at the slideshow,
 create an illuminated letter using the first letter of your last name.
Use the square piece of paper provided.


There are two different approaches to completing your illuminated letter project.
The top piece is more of a traditional approach to the illumination and the bottom piece is a more modern approach. Both pieces are inspired by items that I like and can relate to. You should do the same. 
Using the square piece of paper required, draw your letter first and then add details and embellishments to your design.


7th AR Standards: R7.7.1 R7.7.2 CN10.7.1 

7th- Alana Dee Haynes

Alana Dee Haynes


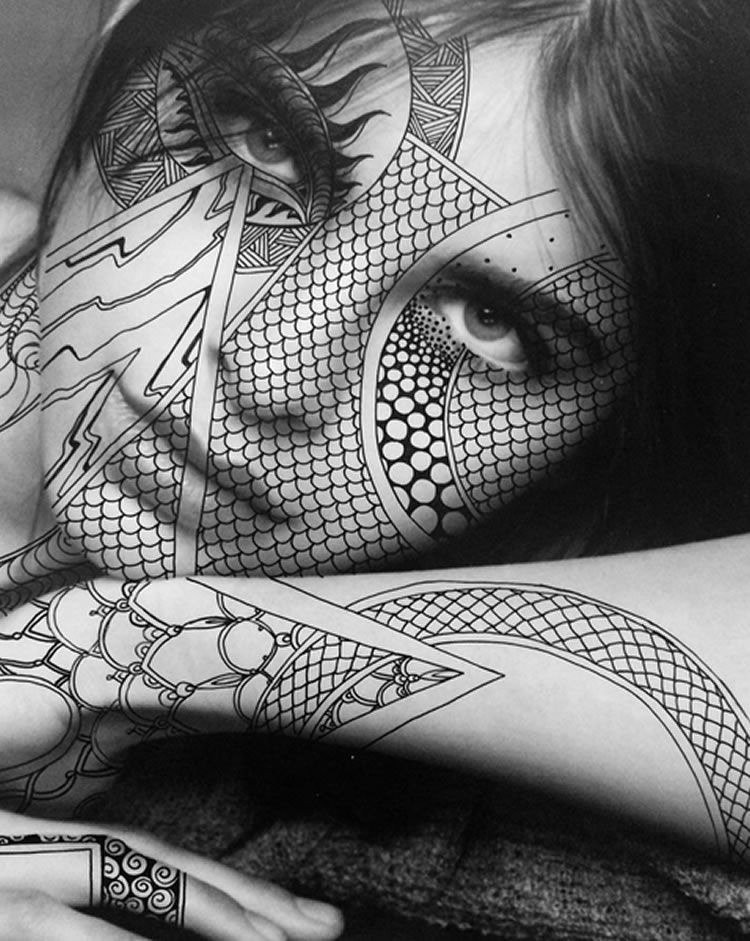
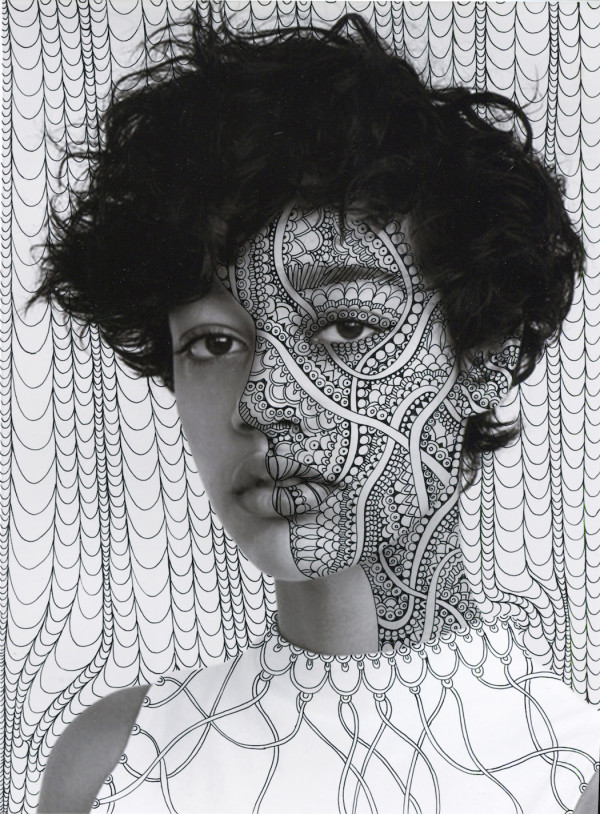
Alana Dee Haynes is a contemporary mixed-media artist who uses photographs as a base for her zentangle styled drawings. She draws meditative patterns across the face and body of the models in the photos and in the backgrounds of the artworks.


DIRECTIONS:


PROJECT 1
You will be randomly assigned a photo of a celebrity/model for this project.
Using a sharpie, add zentangle patterns to your model.
Use at least 5 different patterns on your piece. Take your time and make complex patterns following instructions on TanglePatterns.

You can use a pencil first if you like. 

Please return sharpies back to the appropriate bucket when finished.

Use tanglepatterns.com to find interesting patterns to create for your

piece.


PROJECT 2

You will use a picture of yourself for the second assignment.

After getting your picture printed, you will add embellishments around your photo using a pen.