Classes

Showing posts with label 5th Grade. Show all posts

5th- Design a Shoe

Shoe designers are fashion designers who develop original footwear for an independent label or a company. You must have a good understanding of texture, color and fashion while developing creative new concepts. You also need an extensive knowledge of shoe construction materials, the ability to identify attractive patterns through fashion trend analysis and an understanding of the fundamentals of footwear construction.


There are many shoe factories in the US alone, in fact there are over 900! 

According to these stats on this website this is a thriving market in the US with lots of competition for artists and designers. 


10 Sneaker Collabs

5 of the Most Expensive SB Nike Dunks


DIRECTIONS

For your project you will be designing a 3d shoe based on the Nike SB Dunk. You will be given the basic template and you will choose how to create your shoe.  

You may use a brand that exists or. you may come up with your own brand and logo for your shoe.  

YOUR SHOE NEEDS TO BE BASED ON SOME KIND OF THEME- (Mario, Basketball, Chess, Skittles, anything you can think of!)


You will completely color your shoe, cut it out, and fold it to create a 3d mockup of your shoe design. You will then add shoelaces using one of the many types of thread that I have. 


5th- Robots and Doughnuts with Eric Joyner


Our next project takes a look at contemporary artist Eric Joyner and creating a metallic effect with colored pencils by blending them together. 
Contemporary art is the art of today, produced by artists who are living in the twenty-first century. Contemporary art provides an opportunity to reflect on contemporary society and the issues relevant to ourselves, and the world around us.

Take a look here for more examples of contemporary art:


In 1999, I started to enter various juried shows at Artisans Gallery in Mill Valley, CA. and the work was well received. Shows in other galleries, (usually group shows) were positive as well. In 2000, after years of painting other people’s pictures, I made the decision to only paint things that I liked. Four series of paintings of different subjects were started; they were: San Francisco urbanscapes, paintings of old newspaper cartoons characters, Mexican masks, and last but not least, Japanese tin (toy) robots. Though all four series of these subjects were enjoyable to do, I chose to focus on the tin robots, as they were the most popular and seemed to have the most possibilities. So, armed with a small collection of tin robots and spaceships I began painting them in earnest. In attempt to bring them to life without losing their charm, I showed them where they belonged: outer space. By 2002 the paintings were looking good, but they still needed something to play off of… perhaps a nemesis. After a month or so of searching for a ‘nemesis’ I had an epiphany while watching the movie ‘Pleasantville.’ In one of the scenes, Jeff Daniels paints a still life of…donuts. With thoughts of Wayne Thiebaud’s pastries always close at hand, it wasn’t difficult to see the battle scene of robots retreating from 300-foot tall donuts when I went to bed that night. The rest, as they say, is history.


This video is a tutorial showing some different colors you can blend together to create some metallic textures. 


Directions:


Create a robot artwork inspired by Eric Joyner.
Add donuts (or another type of sweet treat) to your robot drawings like Eric Joyner. 
Create a metallic texture on your robot using the blending techniques we worked on in class. 
There are many robot part examples below here for inspiration. 


AR Standards: CR1.5.2 P6.5.2 R7.5.1 


5th- Zentangles

This lesson will focus on using lines to create different patterns and textures.
We will look at a cool method of drawing called Zentangling, which is a fun, easy way to make some intricate looking artworks.


"The Zentangle Method is an easy-to-learn, relaxing, and fun way to create beautiful images by drawing structured patterns."
"Almost anyone can use it to create beautiful images. It increases focus and creativity, provides artistic satisfaction along with an increased sense of personal well being. The Zentangle Method is enjoyed all over this world across a wide range of skills, interests and ages."
This is the official Zentangle website


This site has many step by step instructions to help you make your zentangle patterns.
USE THIS SITE FOR ALL OF YOUR PATTERNS!!

We will go over how to use the site in class but here are some basic instructions for the website. 

Look through the list of patterns by clicking on the letters of the alphabet at the top of the screen. All the patterns are in alphabetical order. 
Look the pink links in the How to Draw sections for instructions on each pattern, or just scroll down on the page to see instructions. 

PROJECT DIRECTIONS:
Create your own zentangle drawing using at least 5 different patterns in your artwork. 
FILL THE ENTIRE PAGE!
Follow the simple instructions from the website to make 
intricate patterns and designs in your zentangle. 
Share your favorite design ideas with your classmates! 
How does your pattern compare to the original?
How did you change it to make it your own?
Did you fill the entire page?


AR Standards: CR1.5.1 CR2.5.1 P6.5.2 R7.5.1

5th- One Point Perspective


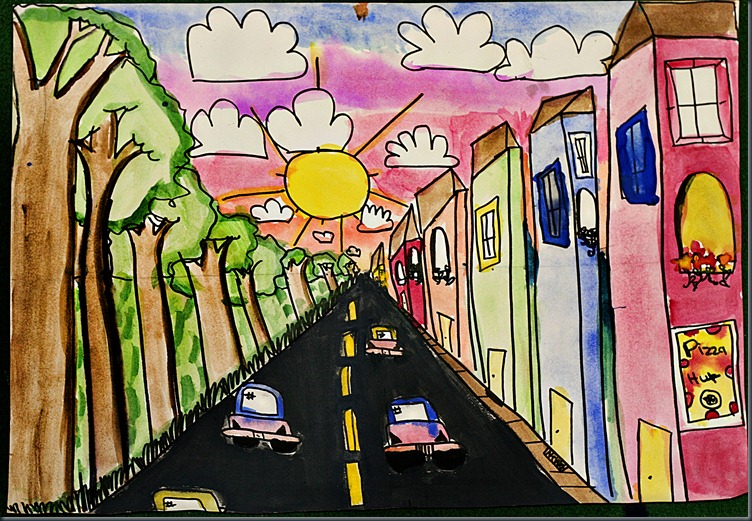
One point perspective is a drawing method that shows how things appear to get smaller as they get further away, converging towards a single 'vanishing point' on the horizon line. It is a way of drawing objects upon a flat piece of paper (or other drawing surface) so that they look three-dimensional and realistic.

Drawing in one point perspective is usually appropriate when the subject is viewed ‘front-on’ (such as when looking directly at the face of a cube or the wall of building) or when looking directly down something long, like a road or railway track. It is popular drawing method with architects and illustrators, especially when drawing room interiors.


Activity:

Today you will begin creating a drawing in one point perspective.
Use the steps from the website below to help you create your one point perspective drawing.
After you finish the steps in the tutorial, be creative and finish your drawing how ever you would like.
Color your piece and turn into Artsonia.


This is the basic drawing


After you complete the basic drawing, finish it in a colorful, creative way.


5th/6th- Art Introduction/ Artimus Prime/ Google Classroom


HELLO!

Welcome to Artimus Prime! This is where you will find all of your information to make it through middle school art this year. We will make many artworks throughout the year utilizing many different art methods and techniques. I hope that you enjoy my class and the challenge that being creative brings to you. Work hard and turn in your work to Artsonia on time and we will have a GREAT year!
Today we will discuss some art rules and procedures that will need to be followed everyday in class for everyone to be successful in the art room. 


Create a Name Tag

Your first project is to create a name tag for your box. Use bubble or block letters to write your name and fill the space with color. 


AR Standards 5th: P.4.5.1 P6.5.1 R7.5.2 CN11.5.1
AR Standards 6th: P4.6.1 P6.6.1 R7.6.2 CN11.6.1

5th- Embellished Portraits with Victoria Villasana

For this project we will take a look at artist Victoria Villasana. She uses yarn and fabrics to embellish portraits of vintage photographs. "Embellish" means to make something more attractive by adding decorative details or features. We will use Google Drawings to create an embellished portrait in her style. Click on the link to take a look at some of her art examples, then take a look at my example of Adam Sandler. We will discuss how to use the Google drawing tools in class. 


DIRECTIONS:

Find and image of a celebrity of your choice.
Upload it into Google Drawings.
Turn it black and white.
Embellish your portrait with colorful lines to create shapes and patterns. 


5th- Ugly Holiday Sweaters/Goofy Ornaments Collaboration


Ugly Holiday Sweaters are a fun tradition for many families.
 Create an original ugly sweater for your holiday party!
Your sweater can be related to some part of pop culture or something goofy.
Anything you want to do!
After you draw you image on the sweater fill the rest of the sweater with patterns and then color it. 


Use this template:


After you finish your sweater, grab some ornament cutouts to decorate for our hallway Christmas tree!
You can decorate your ornament however you like. When you finish give it to me to hang on the tree.


AR Standards 5th: CR1.5.3 R7.5.2 R8.5.1 CN10.5.1
AR Standards 6th: CR1.6.3 CR3.6.1 R7.6.2 R9.6.1 CN11.6.1


5th- Aerial Perspective Google Drawings


Today you will learn about Atmospheric(Aerial) Perspective and create an artwork using Google Draw. 

Click on the link below to learn about Atmospheric (Aerial) Perspective.


Watch the Google Drawing tutorial below for an example of this project and some step by step instructions. 


After watching the tutorial complete your 2 atmospheric (aerial) perspective landscapes.

Your landscapes must include:
1. 4 different background levels for your atmospheric piece
2. An interesting silhouette for the foreground
3. An interesting image/silhouette for the background


5th- Roll a Monster

Our next project is a fun Halloween project. You will use the worksheets as a guide as you roll a die to randomly select the parts of a monster to draw. After you draw your monster you will need to color it in full color. You can also add extra details and textures to make your monster unique. Monsters need to be drawn on the provided paper and fill the page. (No tiny monsters!) You will create two monsters for this project. 


DIRECTIONS: There are 3 different options below.

1. Choose one of the worksheets.
2. Using the virtual dice, roll for each part of your monster and draw that shape.
3. You may add details and extra additions to your monster at this point.
4. Add a background for your monster. 
5. Color your artwork.
6. Repeat the steps above for your second monster!
 
OPTION 1


OPTION 2


OPTION 3


AR Standards: CR1.5.1 P5.5.1 CN10.5.1 

5th-Birds on a Wire Collaboration


Awesome Example of Collaboration in Art ->

This project will be a collaborative art project for all students in this class. We will take a look at creating unity and variety in a large artwork by creating birds sitting on electrical wires. Students will create at least two bird silhouettes to place on a wire, along with other birds made by fellow classmates. Students will decorate their birds using patterns and textures. After creating their birds, students will put them all together on a giant piece of paper with everyone else's birds. 

Remember! A silhouette is like a shadow of a bird. Only focus on the outside edges of your birds shape. Then use patterns and textures to decorate you bird. 

Silhouette Examples


AR Standards: CR1.5.2 CR2.5.2 P5.5.1