Classes

5th Grade- Digital Art and Pixlr!

Our next project is a digital project using the browser based photo manipulation tool, Photopea
We will be creating an artwork that creates emphasis by making everything in a photo black and white and then making one part of the photo colorful. We will then add a radial gradient to the piece to help guide the viewer's eye to your colorful area and add to the emphasis. 

Take a look at the two examples below. You can see the original and the manipulated photos below.

              ORIGINAL                                                                                          COLOR EMPHASIS


Below is a video tutorial of this project. You will need to watch the video tutorial below to help you create this piece. We will also create a 


AR Standards: CR1.5.1 CR2.5.1 CR2.5.2 CR3.5.1 R8.5.1 R9.5.1

8th- Self-Portraits

8th Grade Self-Portrait Unit- 

"Through the Looking Glass"

For the next few weeks we will be discussing portrait art and you will be reflecting on your personal identity and how we think we are viewed by others. This project will take a look at many artists and art forms while creating a body of work that is unique to every student because every student is a unique individual. We will be working on creating a group of artworks for this project. You will need to keep everything that we work on together in a folder or portfolio. You will be presenting all your work as a whole at the end of the project. Keep up with all of your sketches and studies that we work on as well. You may also think about taking pictures, taking notes, drawing in your sketchbook, or writing journal entries to help you work through the projects and presentation. These will all help in your presentation as you explain the processes that we went through to complete your artworks.

WEEK 1:


Day1-2 Group Discussion and Self- Portrait Worksheet 

We will begin by looking at portrait artwork and discussing the definition of what a self- portrait actually is. The first website we will visit, The Art Genome Project, will help lead a class discussion on portrait art. This website discusses historical foundations as well as contemporary views of what a self portrait is. The second site, an edublog, contains a worksheet that students will complete. Follow the directions on the worksheet and complete the assignment on a separate sheet of paper.


"Every artist of every style and period has had a crack at a self-portrait at one time or another. For the artist the interest of the self-as-subject is often expedient: a model they don’t have to pay; a convenient alternative to yet another arrangement of crockery or flowers. 
But for the viewer, the self-portrait opens up a potent range of possibilities: the artist is seen looking into the soul of the person they know best (one would hope), who they care about most (inevitably) and with whom they have the most perplexing relationship – themselves. Meeting their gaze, we take on their position, seated in their chair or standing at their easel; viewer becomes artist in an exchange of roles that makes this perhaps the most compelling of all artistic genres."-- James Hall

Here are some PowerPoint presentations that show many different examples of portrait art from many different artists. Portrait art has been created since the earliest of times, but not until the Renaissance did self- portraits become truly popular. They continue to be an important part of contemporary art today.


DAY 3,4- Drawing Practice: Facial Features 

Now we will work on drawing individual parts of the face. You will need to look at the powerpoint and practice drawing your, 1.Nose  2.Mouth  3.Eye  4.Ear. You must use pencil and try to show as much shading and definition as possible. Each drawing needs to be a half- page sketch.

Use a mirror to look at your own facial features or use your chromebook to take a picture of your facial features for reference. DON'T COPY FACIAL FEATURES OFF OF THE INTERNET. DRAW FROM LIFE. You need to practice drawing yourself to help you prepare for your self- portrait.


Facial Features


End of Week 1 
Take home and complete any of the work from this week that you have not finished. We will be looking at all the different options for creating your artwork as well as starting your first piece during week 2. Also, make sure you are keeping up with all of your sketches and studies since they will be helpful as we continue working on self-portraits.


Week 1 Assignment Recap 

You should have completed these items this week:
1. Portrait WS
2. Four facial feature sketches


WEEK 2

Self Portrait
(based on a famous artist's self portrait)


4-5 DAYS- We will create our first self-portrait work this week. Your first self-portrait must be created in the style of a famous artist. For example, you could create a self-portrait, modeled after Vincent Van Gogh's Impressionist style. Begin by searching for an artist or style of art that you like, or choose one from last weeks worksheet. Ask the question, What makes that artwork unique, how will you create a piece that is recognizable in that style, but still have your own personal flair? 

Take a picture of yourself on your chromebook to use as a reference, you should be working from a photograph of yourself.

       Van Gogh's Self-Portrait                                                Self-Portrait modeled after Van Gogh


From the examples you can see how the two pieces relate to each other. The artist on the right is trying to mimic Van Gogh's style in his piece, on the left.


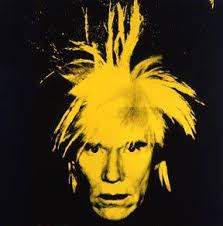
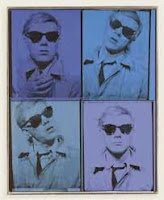
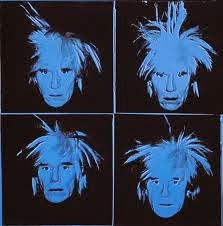
Here is another example: On the left is a piece by Andy Warhol and on the right a piece modeled after Warhol.


How do the pieces relate to each other?


End of Week 2 
Complete your self-portrait that is based on a famous artist's work.
If you haven't completed it, take it home over the weekend to finish. Remember to keep up with any sketches you did during the week for your final presentation.


WEEK 3

8-bit Digital Portrait


2-3 DAYS- 

This week everyone will be creating a digital self portrait using a web based photo editor called Pixlr. This app is a lot like photoshop but can be used for free. You will be transforming a photograph of you into a retro 8- bit self- portrait. Below is a slideshow with examples of 8-bit artwork and below that are instructions on how to use Pixlr to create your 8-bit portrait artwork.


Here are the directions for using Pixlr to create your piece.


End of Week 3

You should have completed and shared your digital piece with me by the end of the week.
All work for the portrait unit should be completed and turned in by this point.


8th AR Standards: CR1.8.1 CR2.8.1 CR3.8.1 R8.8.1


8th-Paper Relief Sculpture


This project will examine relief sculpture and the difference between shapes and forms.
Students will experiment with different paper shapes, folding and curling them into interesting forms.

After they find a shape they like, students will make 50 variations of their form to create a relief sculpture. Students will display their artwork in the hall with a written exhibition narrative for the viewer.


Different types of relief sculpture:

Low-Relief /Ancient Coins


Low-Relief /Ishtar Gate
https://en.wikipedia.org/wiki/Ishtar_Gate?scrlybrkr=8c9a3a4d


High-Relief/ Ludovisi Battle Sarcophagus


Project Examples: 


Here are some examples of paper forms you could try out:


Many more examples of the finished projects can be found here:


8th AR Standards: CR1.8.1 CR2.8.1 P5.8.1 R9.8.1

7th- Pop Art, Andy Warhol, and Candy Bars

What's your favorite candy bar?
This project takes a look at the Pop Art movement, and the artist Andy Warhol. We will create a pop art piece using our favorite candy bar and watercolors. 


1. Take a look at this site, http://www.mikescandywrappers.com/. It contains A LOT of candy bar wrappers.

2. Choose what candy bar you will paint, save an image and practice creating 4 interesting compositions using Pixlr and the crop tool.

Here are some composition tips


3. Choose your favorite cropped image of your candy bar to enlarge as your pop art piece.

4. Draw your candy bar on the 12x18 piece of watercolor paper. Remember to fill the space and use your printout of your cropped candy bar as a reference to create a dynamic image.

5. Paint your candy bar using watercolor to represent the candy bar as accurately as possible.

6. Add a background of color/patterns to finish your piece. 

5th- M.C. Escher and Tessellations

We will be taking a look at M.C. Escher and tessellations in art as you also look at tessellations in the math class.
 
 A tessellation is "a repetitive interlocking pattern of shapes. The pattern fills, or clearly could fill, a surface entirely without gaps or overlaps". A tessellation looks a bit like a simple jigsaw puzzle, but all the pieces are just one or two or three shapes.


M.C. Escher was a 20th century Dutch illustrator whose innovative works explored echoing patterns, perception, space and transformation. Born on June 17, 1898, in Leeuwarden, Netherlands, illustrator M.C. Escher developed a print and engraving style that distinctively played with orientation and space. Influenced by Moorish designs in Spain, works like "Day and Night" featured interlocking forms and transformation on a surreal canvas. Later embraced by both artistic and math/science communities, Escher died on March 27, 1972.


For your project you will create a transition tessellation, using a shape that you create.

 1. Draw a random freeform shape on one side of your square.
The shape should  reach to about the middle of the square and should not touch the corners.

2. Cut out your shape and slide it to the opposite side of the square. Attach it with a piece of tape.
DO NOT overlap the two pieces.


3. Trace your shape across your entire paper. DO NOT leave any gaps in your design.

Start your tessellation in the corner of your paper


It should look something like this when you finish.


4. Create a creature out of your design and color it in.


AR Standards: CR1.5.1 CR2.5.1 CR2.5.2 P6.5.2 R7.5.1

7th- Abstract Paintings

Students will take a look at abstract artists and create an abstract painting/artwork.


9 Abstract Artists


DAY 1

Look at some different abstract artists and artworks on your own.
Choose a style of abstract painting to create your own artwork.

Draw or write your idea down and get it approved through me before you begin.


7th/ Art Intro/Dale Chihuly Macchia Bowls

Hello and Welcome to Artimus Prime and the Art Room!

My goal for you this semester is to learn about all different aspects of art. From artworks to art careers we will take a look at many different aspects of the art world. This year we will be using this blog as a space to find information and ask questions about your art projects. Every project and sketchbook assignment will be posted on this blog for you to reference whenever you need to.

Today we will discuss the blog, sketchbooks, and regular class procedures. As we begin, take a look at these videos about art and creativity. I hope they will inspire and challenge you to create some awesome artwork as we continue throughout this year.


Dale Chihuly and Macchia Bowls


We are going to create Macchia bowl inspired coffe filters today in class.
This will be a one day collaborative project to start the year for 7th and 8th grade art students.


Coffe Filter Instructions


7th AR Standards: CR1.7.2 P4.7.1 R7.7.2 CN10.7.1
8th AR Standards: CR2.8.2 P4.8.1 R7.8.1 R7.8.2