
For our next project, you will take on the role of a cartographer. Cartography, at its core, is the art and science of creating and using maps to represent the physical world.
Take a look at this link to find out more about cartography:
Your task is to create a fantasy map of a fictional world.
As a class we will look at and practice techniques to help you draw iconography on your map to indicate unique landmasses, buildings, and artifacts.
Here is an interesting article on the history of creating fantasy maps:
DAY 1-2 Intro/Inkarnate
The first part of our project will use a website called Inkarnate to create a fantasy map.
There are two free options on Inkarnate to create a map. You can use either choice to create your map. We will learn about and add a fantasy compass rose to this map in Photopea on Day 3.
Day 3
Compass Rose


Today we will add a compass rose to your digital map.
Your compass rose must include
1. A fantasy creature/object
2. Compass
3. Scroll with your world name
.png)
.jpg)
%20(1).jpg)
You will need to find these images online and use remove.bg or photopea to remove the background images.
You will open your map in photopea and add your compass rose to the map by using
File>Open and Place to place your items
and
Edit>Free Transform to resize and move your images

DAY 4-9 Hand-Drawn Map
On day 4 we will begin practicing drawing different landmasses and transitioning into the hand drawn map portion of the project by building your world, let's look at this skillshare and talk a little about building your fantasy world.
Take some notes today focusing on the three steps of world building and
1. Physical setting and what it looks like
2. Society, people, and how they interact with one another
3. History and backstories of people and places
4. Consistency in history, physical description, names of areas
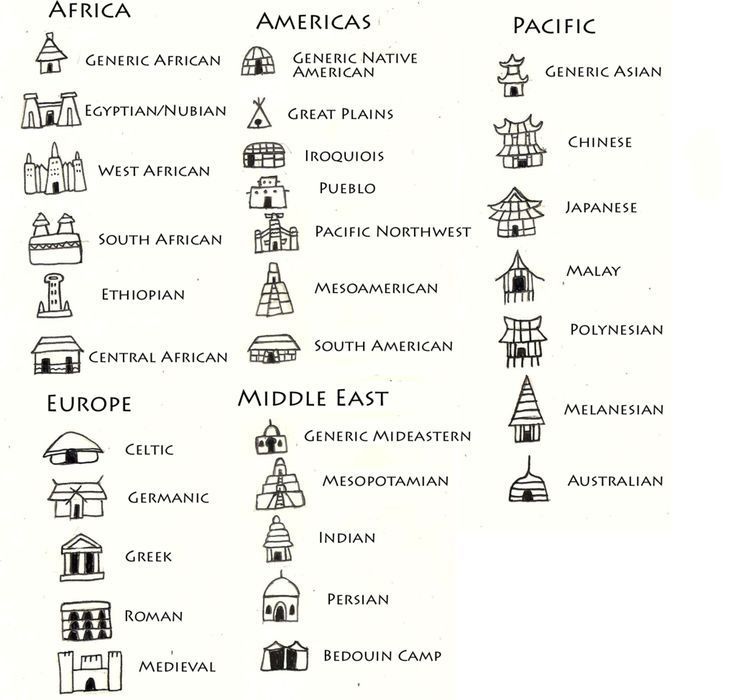
Your next step will be to practice some different landmarks.
Create a
mountain range, forest, city, fort/castle, ancient ruin, and something of your choice.


.jpeg)
After that you will be able to begin your map drawing. We will use micron pens to outline your artwork. After you finish your drawing, we will age your paper by painting a brown watercolor wash over your map. You may also tear and wrinkle your map along the edges to create even more of an old map feel.
Here are some links for inspiration and some step by step map making:


No comments:
Post a Comment