ARTimus Prime is your destination to check out all the projects going on at the Fountain Lake Cobra Digital Prep Academy. Bookmark this page to check back here all year to see what we are doing in the Art Room and to keep up with all of your assignments.
Your second task will be to find an item in the real world that looks like a face and take a photo of it. Then you will use what you learned creating your emoji smiley to create a unique character from your item.
Take a look at the video for some examples of this. This is a phenomenon called pareidolia and everyone experiences it.
NOW take a look at the slideshow and begin your project!
This lesson will focus on using lines to create different patterns and textures.
We will look at a cool method of drawing called Zentangling, which is a fun, easy way to make some intricate looking artworks.
"The Zentangle Method is an easy-to-learn, relaxing, and fun way to create beautiful images by drawing structured patterns."
"Almost anyone can use it to create beautiful images. It increases focus and creativity, provides artistic satisfaction along with an increased sense of personal well being. The Zentangle Method is enjoyed all over this world across a wide range of skills, interests and ages."
We will go over how to use the site in class but here are some basic instructions for the website.
Look through the list of patterns by clicking on the letters of the alphabet at the top of the screen. All the patterns are in alphabetical order.
Look the pink links in the How to Draw sections for instructions on each pattern, or just scroll down on the page to see instructions.
PROJECT DIRECTIONS:
Create your own zentangle drawing using at least 5 different patterns in your artwork. FILL THE ENTIRE PAGE! Follow the simple instructions from the website to make intricate patterns and designs in your zentangle. Share your favorite design ideas with your classmates! How does your pattern compare to the original? How did you change it to make it your own? Did you fill the entire page?
During the Renaissance one artist was centuries beyond his time--Giuseppe Arcimboldo. While the Great Masters such as Michelangelo and Raphael focused on rendering human figures realistically, Giuseppe Arcimboldo created surreal portraits of his subjects made of vegetables, plants, fruits, sea creatures, tree roots, and books. In this class we will create our own paintings mimicking Arcimboldo’s unique style using fruits and vegetables.
WATCH THE VIDEO ABOVE AND ANSWER THE QUESTIONS IN THE GOOGLE FORM BEFORE YOU BEGIN YOUR ARTWORK!!
Giuseppe Arcimboldo(also spelled Arcimboldi; 1527 - July 11, 1593) was an Italian painter best known for creating imaginative portrait heads made entirely of such objects as fruits, vegetables, flowers, fish, and books - that is, he painted representations of these objects on the canvas arranged in such a way that the whole collection of objects formed a recognizable likeness of the portrait subject.
Arcimboldo was born in Milan in 1527, the son of Biagio, a painter who did work for the office of the Fabbrica in the Duomo. Arcimboldo was commissioned to do stained glass window designs beginning in 1549, including the Stories of St. Catherine of Alexandria vitrage at the Duomo. In 1556 he worked with Giuseppe Meda on frescoes for the Cathedral of Monza. In 1558, he drew the cartoon for a large tapestry of the Dormition of the Virgin Mary, which still hangs in the Como Cathedral today.
CLICK THIS LINK TO VIEW ARCIMBOLDO'S COMPLETE WORKS ->
UNITY - A principle of art, unity occurs when all of the elements of a piece combine to make a balanced, harmonious, complete whole. Unity is another of those hard-to-describe art terms but, when it's present, your eye and brain are pleased to see it. VARIETY - A principle of art concerned with combining one or more elements of art in different ways to create interest.
How does Arcimboldo create unity in his artworks?
How does Arcimboldo create variety in his artworks?
How will your create texture on your items to make them look realistic?
YOUR PROJECT is to create a portrait of a person using vegetables, fruits, or other objects to make the person's face.
You may use any items you would like to make your person. Like Arcimboldo, your items should all relate to each other to create a theme for your portrait.
AR Standards: CR1.6.2 CR2.6.1 R7.6.1 R8.6.1 CN11.6.1
Our next project is a fun Halloween project. You will use the worksheets as a guide as you roll a die to randomly select the parts of a monster to draw. After you draw your monster you will need to color it in full color. You can also add extra details and textures to make your monster unique. Monsters need to be drawn on the provided paper and fill the page. (No tiny monsters!) You will create two monsters for this project.
DIRECTIONS: There are 3 different options below.
1. Choose one of the worksheets.
2. Using the virtual dice, roll for each part of your monster and draw that shape.
3. You may add details and extra additions to your monster at this point.
4. Add a background for your monster.
5. Color your artwork.
6. Repeat the steps above for your second monster!
Our next project will take a look at the art of mosaics and stained glass. Mosaics have a long history, starting in Mesopotamia in the 3rd millennium BC. They were typically made from clay tiles, pebbles and sometimes glass. They often depicted religious subjects or were purely decorative. You will be able to choose any photo you would like to create for your mosaic and we will discuss how to use the Google Drawing tools in class. Take a look at the links below for inspiration and some of my examples in the photos.
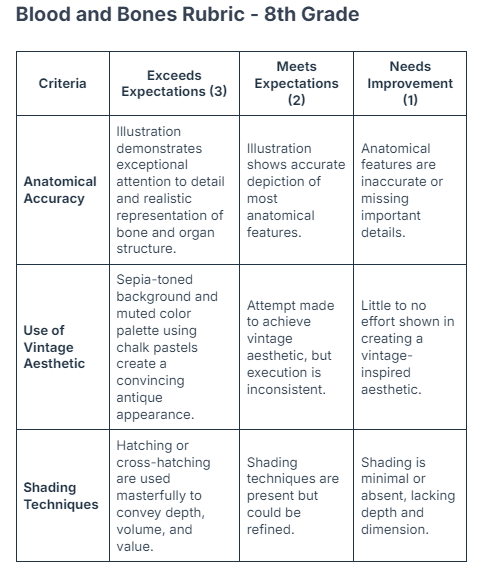
Students will look at reproductions of anatomical illustrations to inspire these gruesome masterpieces. Careful observation are encouraged in order to retain realistic accuracy of the structure of the bones and organs. We will employ a variety of techniques to create a vintage “antique” feel to our drawings, including painting a sepia toned background and using chalk pastels for hints of muted color. Final touches include creating a wire frame around our drawings, and adding optional “blood” splatters.
“Memento mori is a Latin phrase meaning ‘remember you must die’. A basic memento mori painting would be a portrait with a skull but other symbols commonly found are hour glasses or clocks, extinguished or guttering candles, fruit, and flowers.
Closely related to the Memento Mori picture is the Vanitas still life. In addition to the symbols of mortality these may include other symbols such as musical instruments, wine, and books to remind us explicitly of the vanity of worldly pleasures and goods.
The Vanitas and Memento Mori picture became popular in the seventeenth century, in a religious age when almost everyone believed that life on earth was merely a preparation for an afterlife.”
Take a look at the slideshow link below for the intro


.jpg)